SDKs
Web SDK
Learn how to install and integrate your website with Web SDK.
Overview
This section demonstrates how to set up DataSenses’s JavaScript library on your website, track events, create user profiles using the DataSenses web SDK. Before getting started, complete the integration steps mentioned in Web SDK Quick Start Guide.
Prerequisites
Ensure you have the following prerequisites to start the Web integration:
- DataSenses account to get DEV_KEY
Step1: Install the Web SDK
Option A: Add the DataSenses JavaScript Library Manually to Your Website
To get started, use the following steps:
- Copy and paste the code snippet below inside the <head> section of your website.
- Replace DEV_KEY with your DataSenses DEV_KEY. You can find your DEV_KEY on the _Settings page of the DATASENSES dashboard. 3: Get the newest sdk version at https://www.npmjs.com/package/datasenses-web-sdk
<script type="text/javascript" src="https://cdn.datasenses.io/datasenses-v1.2.1.min.js"></script>
Option B - Using the Package Manager
npm install datasenses-web-sdk --save
Step2: Initialization
1.Import datasenses in a React project
import datasenses from 'datasenses-web-sdk'

datasenses.init("{{DEV_KEY}}")
- Import datasenses in a raw javascript project
<script>
    window.datasenses = window.datasenses || [];
    window.datasenses.init("{{DEV_KEY}}");
</script>
- Import datasenses in a NextJs project
Example of a NextJs folder
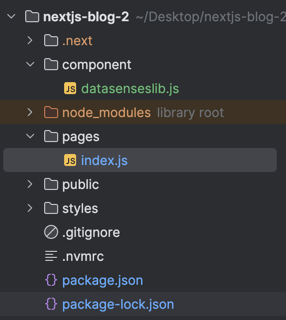
Create a component folder, and add file "datasenseslib.js" and add the code below.
   import {useEffect, useRef} from "react";

   export function useDatasenses() {
       const datasensesRef = useRef(null);

       useEffect(() => {
           const initializeDatasenses = async () => {
               try {
                   const datasensesModule = await import('datasenses-web-sdk');
                   const datasenses = datasensesModule.default; // Adjust this based on how the SDK exports itself

                   datasenses.init("<DEV_KEY>"); // Initialize with your development key
                   datasensesRef.current = datasenses;
               } catch (error) {
                   console.error('Failed to initialize Datasenses SDK', error);
               }
           };

           initializeDatasenses();
       }, []);

       return () => datasensesRef.current
   }
Load datasenses package in your file code. An example as below
import {useDatasenses} from "../component/datasenseslib";

export default function Home() {
   const datasenses = useDatasenses();

   const sendTest = () => {
      console.log(datasenses);
      datasenses().event.push('login', {
         "customer_id": "123456",
         "email": "[email protected]",
         "phone": "84999999999"
      })
   }

   return (
       <>
          <button onClick={sendTest}>sendtest</button>
       </>
   );
Step3: Send Events
3.1. Send Login Event
We use login event to identify the customer. Naming convention of fields need to be followed by our format.
datasenses.event.push('login', {
    "customer_id": "123456", // String - We use customer_id field as customer's id,
    "email": "[email protected]", // String - We use email field as customer's email
    "phone": "84999999999", // String - We use phone field as customer's phone
})
3.2. Send Charged Event
We use charged event to calculate the revenue, ROI, Marketing performance of your project.
Note:
- If you want to monitor revenue of your product. You need to add the items filed with item_id as product's id for us to proceed this event
datasenses.event.push('charged', {
    "items": [
        {"category": "Phone", "name": "Iphone X", "price": 119000000, "item_id": "2", "qty": 1},
        {"category": "Phone", "name": "Samsung Galaxy", "price": 119000000, "item_id": "3", "qty": 1},
    ], // Array - We use items field as list of items of the conversion event, must have item_id, name, price, qty of each item
    "charged_id": "123", // String - Use charged_id field as a conversion's id
    "amount": 238000000 // Number - We use amount field as a conversion's value
})
3.3. Send Customized Events
You can add any additional events
datasenses.event.push('add_to_cart', {
    "category": "Phone", // String, To analyze more efficiently, please don't change name of the field
    "name": "Iphone X", // String, To analyze more efficiently, please don't change name of the field
    "price": 119000000, // Number, To analyze more efficiently, please don't change name of the field
    "item_id": "2", // String, To analyze more efficiently, please don't change name of the field
    "qty": 1 // Number, To analyze more efficiently, please don't change name of the field
})
3.4. Send Event With Raw Javascript
<script>
    window.datasenses.event.push('visited_page', {
    "category":"Phone", // String
    "name":"Iphone X", // String
    "price":119000000, // Number
    "item_id":"2", // String
    "qty": 1 // Number
})
</script>
Send event from your backend
curl 'https://uatevent.datasenses.io/v1/event/single?' \
  -H 'content-type: application/json' \
  -H 'sdk-dev-key: <DEV_KEY>' \
  --data-raw '{
        "event_name":"login",
        "event_properties":{"customer_id":"7658fd58-04fb-44e5-9a7c-813e3cad9a16"},
        "client_id": requiredFields.get("client_id"),
        "user_agent": requiredFields.get("user_agent"),
        "platform": requiredFields.get("platform"),
        "referrer": requiredFields.get("referrer"),
        "sdk_version": requiredFields.get("sdk_version"),
        "unix_timestamp": requiredFields.get("unix_timestamp"),
        "app_instance_id": requiredFields.get("client_id"),
}'
You can get some fields such as client_id, user_agent, platform, referrer, sdk_version, unix_timestamp, app_instance_id (= client_id) by calling this function from DataSenses's sdk
import datasenses from "datasenses-web-sdk";

datasenses.init("<DEV_KEY>");

requiredFields = datasenses.getSdkRequiredFields();